Showing posts with label Christmas crafts. Show all posts

Tuesday, February 21, 2023

How to make candle holders from old glass bottles

 Do you have lots of leftover glass jars from pasta sauce, pickles, jams, or baby food bottles? Instead of throwing them in the recycling, how about reusing them. 

Reusing is a better alternative to recycling. Reusing gives a new life to the jars. It does not utilize any energy needed to recycle the product and thus, saves pollution. If we have a choice between reusing and recycling, we should choose to reuse.

Glass jars can be reused by using them as containers. Instead of buying plastic containers, use old bottles as containers. Glass jars can keep the food fresh longer than plastic containers. Glass is nonporous and hence no bacteria or insects can get inside. It does not get stained and yellow with use. The food stays fresh and tastes better. The clear glass makes it easy to see what's inside. In case you want to show off what's inside, it also makes a perfect choice. Easy to see, easy to find. 

Other than containers, glass bottles can be used as flower vases. We can use them to hold tissue papers or cutlery. The list is as big as your imagination. Today, I am sharing with you a project I did with glass jars. I have many small jams and honey jars at home. They are small so cannot use them as a container or flower vase, but these are the perfect size to use as candle holders.


It is an excellent project to be done with little children. All you need is acrylic colors and decoration accessories like string, sequins, or beads. We painted the jars in bright colors. We used red, blue, orange, yellow, green, and purple. Paint it from all sides. When they are still wet, press sequins and glitter to embellish them. They adhere to the paint when they are wet. If not, dry the jars and then glue them on the jars. We tied a golden string around them. 

What I like is that when a child paints, the brush strokes are rough. They are not smooth and perfect like adults would paint. That's what makes them look prettier.

Last but important is that when you reuse the bottles, always remember you are inspiring others to do the same. The little eyes are watching you. Inspiring people and spreading the importance of recycling, reusing, and reducing is done by action, not words.


Wednesday, June 11, 2014

DIY/ recycled craft : Rocket

I had saved the cardboard tube of the kitchen roll to be used when I will get a idea to do a recycle craft. Today I finally got the idea. 

rocket- yes the tube perfectly fits the shape of a rocket. My planet loving son is very fond of rockets and UFOs.  I cut a yellow paper according to the size of the tube to cover the tube. Then two sets of blue and green strips, a few stars and circles to decorate the rocket. I also cut 3 legs for the rocket with a free hand design. A cone was made of the same orange card stock which I used for the legs. 


First glue all the decorations on the base paper. By this time my son who was sleeping got up. He wanted to be part of this activity. So I told him to apply glue all over the back of the yellow base paper. I glued it to the cardboard tube. With a sharp knife I made 3 insertions a little above the bottom of the tube for the legs in a way that the legs would touch the ground once inserted. Insert the orange legs inside. The conical top was glued to the top part. 

Friday, December 14, 2012

Holiday craft for all ages

I have been busy drawing and creating stuff for my shop. I am loving Etsy . It is fun. What I love te most about Etsy is the personal connections you are able to make. I haven't made as many sales on Etsy as I have done offline. Etsy requires much more marketing while I guess offline people know me and can see how good the item looks.. well..I need to work on that..:) If you haven't checked out my shop you should check it out right now..I have many more items to fill in yet.. My mind is busting of ideas but time is a constraint. Being a full time mom is not easy!

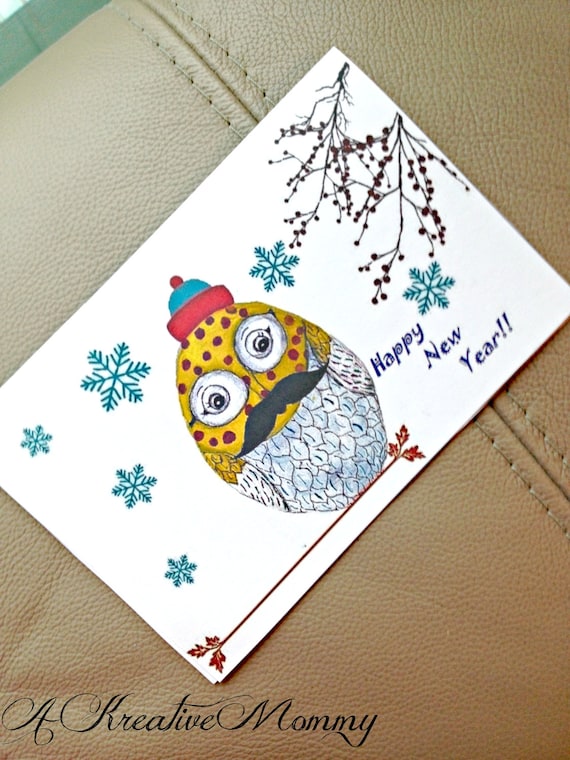
School holidays have already started and if you are looking for some creative activities for your kids or to do as a family..how about making cards for your loved ones.. It's ok if you are not very artistic ,  I have uploaded some DIY Christmas/ holiday / new year cards + gift tags, all you have do is download them, scan and then cut.


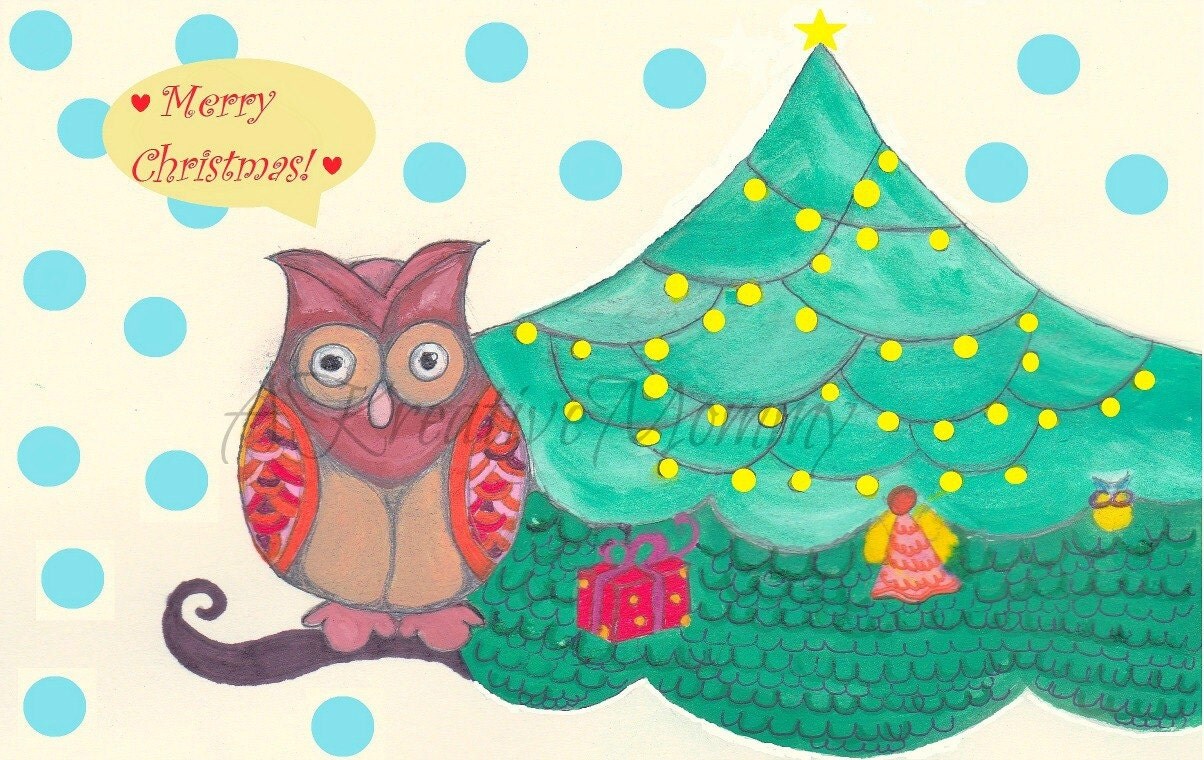
You can get this cute little owl in PDF format here!! Just print, cut and give!!!


Oh yes.. a polka dotted owl with a mustache.. isn't he cute!!  I painted this owl as a gift tag initially.. But later thought he is too cute and will look much prettier on a card instead..so there I put him in festive mood with a holiday cap and waxed his mustache (lol).. the snow started falling behind him and a cherry branch just popped out from the side..
This cutie is avialable with 2 gift tags.. all formatted for A4 size .. easy to print..just cut , fold and give!! oh  and you also have a option to choose " happy holidays" or " happy new year"..You can find him here!!


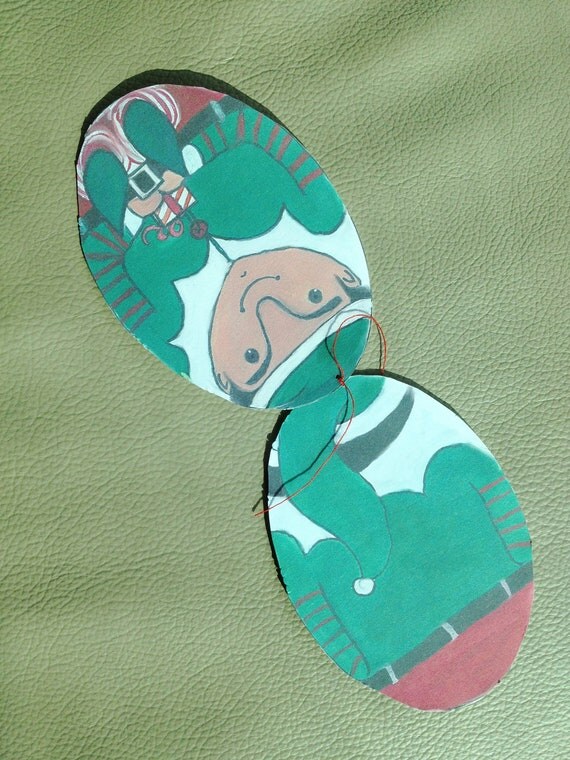
This cute little elf with a gift in his hand is a watercolor painting ..I painted both the front and back side of the elf. I then formatted them such that the lines and features all fall in continuity as if it is one piece.  I shaped him in a oval shape. 


I have created a easy format by which one can cut both these shapes easily. just print, cut and fold. There are several ways to use them. Either as a gift tag, card or an ornament. As a gift tag you can punch a hole and pass a ribbon Or you can do like I have done use a needle and pass a thread through it to attach the loop to the gift.
As a card you can just put the elf in a envelope and gift.
As a ornament you can stick both sides together and then hang it for decoration..
You can find this little guy here!!

I am loving doing printables.. They give lot of flexibility. One can use them in numerous ways  in any creative form you wish. 


Saturday, December 18, 2010

Christmas table Decorations: DIY

In continuity with the previous Christmas decor post, here  are some more cool, easy, adorable ideas to decorate your holiday table .... ideas to give instant stunning look to your table decor.. to make the decor special  for  the occasion...to make that perfect hostess impression on your guests!!   Here are some Christmassy ideas for place cards..

                                                                                                                               Courtesy: Wunderweib


DIY angel napkin holder ..This one is made of aluminium foil..It's easy to make and looks so stunning.. Your guests will blown away be the pretty and adorable angels on their dinner plates..  Let's see how it is made...


Cut out the shape...Tape the back corners to create a funnel like shape..Take a shiny ribbon ..Fold it several times and cut into  triangles.. Stitch the triangles together and to the angel shape..Roll the napkin and put it in the gap behind the head!! Voila!


                                                                                                                                                                                                                                  Courtesy: Country living


Don't have much time .. Here's something pretty - a pretty jar converted into a tea light holder with a wire coiled around it..The name tag is a simple tag but did anyone notice:) Dim the lights and enjoy the glow on everybody's faces!!!


                                                                                                                                                                                                                                                                   Courtesy: Wunderweib

Remember the Christmas decor I did with poinsettia plants .. If you liked that one you would like this one as well... a simplest way to decorate your table...Give natural touch to your table decor with a branch of poinsettia plant..Write your guests name on it with a marker..Use napkins of matching color!!! 


                                                                                                Courtesy: Martha Stewart
Make paper trees and add stars will have the name of guest. Download the pattern here. Slit the pattern in the middle black line.. Fold in such a way that the part where there is green arrow should be inside and the red arrow one outside..

                                                                                                                                                                                                                                                             Courtesy: Wunderweib
Use a snowflake cookie cutter as a napkin ring ..Attach a same colored name to it!


                                                                                                                                                                                                                                                            Courtesy: Martha Stewart
A cupcake candle and the cute heart with some greenery makes the pretty table  look more merrier!!


                                                                                           Courtesy: Etsy

Add some extra cuteness to your table by printing a printable merry owl greeting cards and use them as place cards. You can download these patterns here!!


                                                                                                                                                                                         Courtesy: Martha Stewart

How about a romantic table setting with scroll place cards with some berries ..

                                                                                                                                Courtesy: Country living 

I love this one.. Snow flake chocolate cookie with a few paper snowflakes on a lovely white and red table setting...Put a instant smile on your everyone's faces...Get the recipe of the chocolate snowflake cookie here.


                                                                                                                                                                                             Courtesy: Martha Stewart

These paper plate angels will be great family activity to do and will brighten up any family holiday table setting .. see how to make them here.


Watch this lovely YouTube tutorial to make a Christmas tree from your napkins.. 


Do check out my earlier Christmas decor posts here..

Tuesday, December 7, 2010

Hot and Sweet !!


Cherry & kirsch cake

Baked a chocolate cake ... frosted it with cherry & Kirsch cream!!!

Christmas log cake
Christmas log cake

A chocolate log cake with coffee and chocolate butter cream frosting.. Snowman with butter cream with marzipan heart hat!!

golden christmas tree


Golden Christmas tree on a vanilla cupcake!!

Joining the party at Patty for Weekend wrap up!!

Tuesday, November 30, 2010

2011 Calendar..


A few days back I visited the museum to see the painting exhibition of renowned artist Cheong Soo Pieng at the Singapore Art Museum..The paintings were enchanting!! What I loved about the paintings were elongated limbs and torso, almond-shaped faces which are signature of his masterpieces!! 

painting
I really loved his style and incorporated it in my new sketches :) Now my ladies have almond shaped faces and big eyes as well!!


I made a few more sketchs.. then digitally painted them . Last week I sat down every evening  to I put them all together..  I finally by Sunday I had made my very first 2011 Calendar!! Yipee!!

2011 calendar

 All the paintings are associted with the months.. For example.. Polka dot French hens in April for Easter.. Ganesha for Ganesh Chaturthi in September..and so on..


Here's a sneak peak of the front page of the Calendar..


 I think they would make a pretty Christmas/new year gift!!

Monday, November 29, 2010

Christmas decor

In Singapore Christmas is a month long festival..The city dazzles from Nov to New year.Every year Singapore has a theme for the tropical Christmas ..this year it is Christmas in love!! There is lot of music,dance,night feasts, Christmas floats and lot more events happening in the city!! 

Getting into the mood I have decided to decorate  my apartment for Christmas early this year!! In this tropical country we don't need a fireplace.. but I am kind-of missing having one since I had one in Zürich.. Can you believe I actually (by mistake) brought the firewood we had in Zurich with our shipment to Singapore.. hmmm..That's another story!! So to fulfill my desire to have a mantle ..I have decorated the new mahogany cupboard top which we bought recently. It also serves as a divider between the living area and the dining area.. This is how it looked like till a few hours before..


Tropical deco before

This is now it is looks like now..

mantlenw

All decked up for Christmas...


1


I brought 3 plants of Poinsettia this weekend.. Two of them I placed at the end of the cupboard top.Decorated them with some golden ornaments around the base.


carriage


On one side I kept a cute little carriage full of presents and gifts..I had bought it from a Christmas shop in Schwarzwald area(Black forest) in Germany!!


gold&silver


On the other side I kept a silver leaf near the pot..I just love the colors..the striking red and the golden ornaments!! It looks very festive!!!


2


In the center I kept my crystal reindeer on a wooden box!!  I love this reindeer ..It from a Christmas market in Zurich.. It looks so beautiful.. its pose, shape and the bells to its antlers/horns are very pretty..I fell in love with him the moment I saw him!!!


Xmas

I placed some tiny pine cones near the box.. It is actually a tea &spice box which I got as a Christmas gift from a online grocery store(migros)  in Zurich!! 


xmas


How can I forget my cute Santa candy jar... I love him to bits:)


Joining the parties at th Susan @ Between Naps on the Porch for Metamorphosis Mondaywith Diana @ The Girl Creative for Just Something I Whipped Up  ,with Cindy @ Cottage Instincts for Make it 4 Monday ,Marty's Tabletop Tuesday , Becca @ Blue Cricket Design for Show &Tell , the Lettered Cottage for Holiday home linky partyGina @ the shabby chic cottage for Transformation Thursday , Sharon&Rekha @The key bunch for December Carnival , Emreen@ Liven things up for Its Festival time ,Cindy @Romantic home for Show &Tell  Friday , Robin@All things heart and home for all things merry and brite and Lori @bedifferntactnormal for Show&Tell!


Sunday, November 21, 2010

Christmas table: DIY Napkin rings

Continuing with the earlier post of Christmas decoration inspiration today I am going to show you some cool and easy DIY napkin rings ideas!! As I always say all the items for decoration or table setting are usually available at home you just need to look for them!! These simple and beautiful ideas are exactly this!!!

                                                                                            Courtesy: Martha Stewart 
Bring Christmas to your table with these napkin rings made with felt holly leaves and jingle bell .. You can get the template for the leaves here. Trace these on white felt sheet. Cut them accordingly .Fold and iron to give the leaf like effect. Tie the bell and the stems of the leaves with a cord!!


                                                                                                   Courtesy: Woman's Day
This one is perfect for any seasonal ( summer or spring) or nature themed table decor!! A perfect setting for people on this side of the globe where it is warm and sunny during Christmas:) A quick setting using seasonal fruit.. Tie the stem of kumquat and some leaves with a red cord..!!

Napkin Folding
                                                                                                                                                                                 Courtesy: Canada Living

A 10 minute napkin ring DIY idea !! Glue grapevine wire around paper-towel tube and fix a red bow to it!!!  Looks pretty isn't it!!!

                                                                                                                  Courtesy: Real Simple
Don't have much time on hand .. want to make something fast with the napkins ..This could be the solution!!  Turn a tray into table mat and tie the cutlery with ornaments!! Simple..you can ask your kids can do this as well!!


                                                                                          Courtesy: Country living
Another fantastic quick DIY idea !! Roll the napkins and tie a Christmas ball or ornaments to it.Fix the place card in a pine cone from the garden!! Simple yet so beautiful!!

                                                                                             CourtesyCountry living
How about something different.. Instead stacking the napkin in usual flat style, why not roll them!!! Napkin Pyramid with Christmas ball and green leaves .. You know what I think add a small pine cone and use pine branch to it !! 


                                                                                                                                                                                          Courtesy:  Martha Stewart 
Last but not the least ..Isn't this cute!!!! Bells made with crepe paper.. I just love this idea!! Red bells look striking on the white crisp napkin...You can get the instructions here.


Friday, November 19, 2010

Christmas table Decorations

I was looking for inspirations for Christmas table decorations..I found so many fantastic ideas ..I am totally inspired!! I want to share them with you all so you will feel inspired as well..Its a long one so I will divide it into two part..Let's start with part one!


                                                                                                                                                                      Courtesy: Wunderweib


For this decoration, you need a blue cloth napkin, lily, White& red cord, berries sprig and some pine. The entire table should be around blue,red and white theme. The table cloth is blue with red ornaments spread around. The serving plates are blue or white. The white & red cord is tied around the stems of the glass with berries.. It looks so elegant and stylish!!!


                                                                                                                                                         Courtesy: Essen und Trinken

The color theme of this Christmas table is white..The cloth napkins are white.. There are tiny glass birds sitting next to the napkin ..pink for ladies and white for the men!! The centerpiece is so pretty with pine, candles and birds on it.. I love the way the place mats are arranged under the plates!!!


                                                                                                                                                               Courtesy: Essen und Trinken

This table decoration has the traditional Christmas color theme- red and white. The red embroidered linen napkins with plaid ribbon gives a quaint vintage charm to the table. It is so gorgeous !!

                                                                                                                  Courtesy: Martha Stewart 


This stunning white and red table setting theme looks fabulous with the stunning red carnation centerpiece with a red ribbon tied around the base!! It is minimalistic and stylish!!


                                                                                                                                                                         Courtesy: Wunderweib


The red and white theme continues here as well.. The table runner on a white table has a brilliant effect.. The single amaryllis flowers in glass and the pine cone candles provide a neat and stylish centerpiece.. I like the idea as it is less space consuming as well as simple arrangement and yet so radiant!! Don't miss the beautiful chandelier made of a metal ring candle holder with silver ornaments hanging to it!!!


                                                                                                                                                               Courtesy: Essen und Trinken

The green and glittering gold theme dazzles this table setting. The green and orange ornaments, the greenish candles and the golden  vases compliments the theme fabulously..The two linen table napkins rolled together along with a red berry's branch completes the festive setting!!


Are you saying you are already inspired ..wait.. look out for the next part  of Christmas table setting here !!! It has even more fabulous ideas!!!

Have a nice weekend!!!


Monday, November 15, 2010

Freebies: Gift tags


Last week was very active..I have started jogging early in the morning around 5: 30 am ! It feels sooo good.. the air is so crisp and fresh in the morning..the breeze is cool ...It keeps me so positive and cheerful all day!! If you are feeling low in energy during the day try this..you will feel totally energized for rest of the day!!


This weekend we watched two fabulous movies - Golmaal and Unstoppable .. Both are highly recommended!! I have been trying my hand at digital painting. I haven't figured out much of the techniques .. The above one I had sketched earlier (long time back actually) and painted it yesterday digitally. I know I know.. I have lot to improve:)


I also made these Christmas gift tags. I have uploaded them on scribd. You can download them here. Cut along the dotted lines.. I print it on self adhesive paper and peel it and stick it on the parcel..Alternatively print on a card stock  paper, cut them and make a hole with a punch or with a needle and pass a ribbon or golden thread through it!!!

Linking it to Patty's Weekend Wrap and Susan's Metamorphosis Monday!!!

Thursday, September 16, 2010

Cinnamon Candle Tutorial

Warm, bright and comforting cinnamon candle create a festive ambiance . Cinnamon is one of favorite spices.. I always put a small piece of cinnamon stick in curries or coconut rice or Biryani..


This project came to my mind because I had lots of cinnamon  and I didn't want to throw them as there are restrictions on how much spices we can ship from Zürich to Singapore. Necessity is the mother of invention!!


So the idea came from the similar kind of cinnamon candles I had bought from Christmas market in Zürich last year..So I decided to try make them myself..


I have to admit that there many easier ways to do this project(I will share with the links of the easier methods at the end of this post)..If you decide to it my way,please be careful with the flame of the lighter especially if you have small kids.


Let's see what is needed for this craft project...


Pillar Candle 
Cinnamon sticks
Candle lighter

Let's start..
Spread a paper or cloth on your work station. So that the melting wax won't drip on your table.. Start melting the top layer of wax with the lighter.Only heat that area where you will be fixing the cinnamon stick.


In 2 seconds or so when you see the wax starts melting, press the cinnamon stick on it. Hold it for 5-6 secs or till you think it is fixed permanently to the candle.


I melted the wax near the fixed Cinnamon sticks by holding it horizontally. I let the wax drip over the fixed stick..so as to fix it. 


At the end my goal was accomplished ..I used almost all of the Cinnamon sticks I had..Plus I covered my plain candle too..To be honest I had tried painting and then this  project on the same candle and both of them failed..so it was more like either I throw it or beautify it;)


It took me an hour for this medium sized candle.. I put a few drops of cinnamon oil in the candle to enhance its fragrance ..

I made another smaller candle with star anise . But star anise has a very strong smell .. though it does look good in decoration and in food...

Ok..so as I was saying earlier this method is not the easiest/simplest of the ones..Just recently I found out while goggling something that Martha did this same kind of candle way back in 2005 with a hot glue gun..Check it out here.

These candles are perfect for Fall and Christmas!! I think I am gonna make some more cinnamon candles..(once my stuff arrives from Zürich)!!

ShareThis